TTRPG Initiative Tracker
This application is the result of not having the exact tool I want to use, and a few sessions of vibe-coding with Google Gemini.
Use at your own risk.
A web-based application designed to help Dungeon Masters (DMs) manage and display combat initiative for tabletop role-playing games (TTRPGs). It features a DM admin interface for controlling encounters and a separate player display view suitable for an external monitor or for players to view on their own devices.
Features
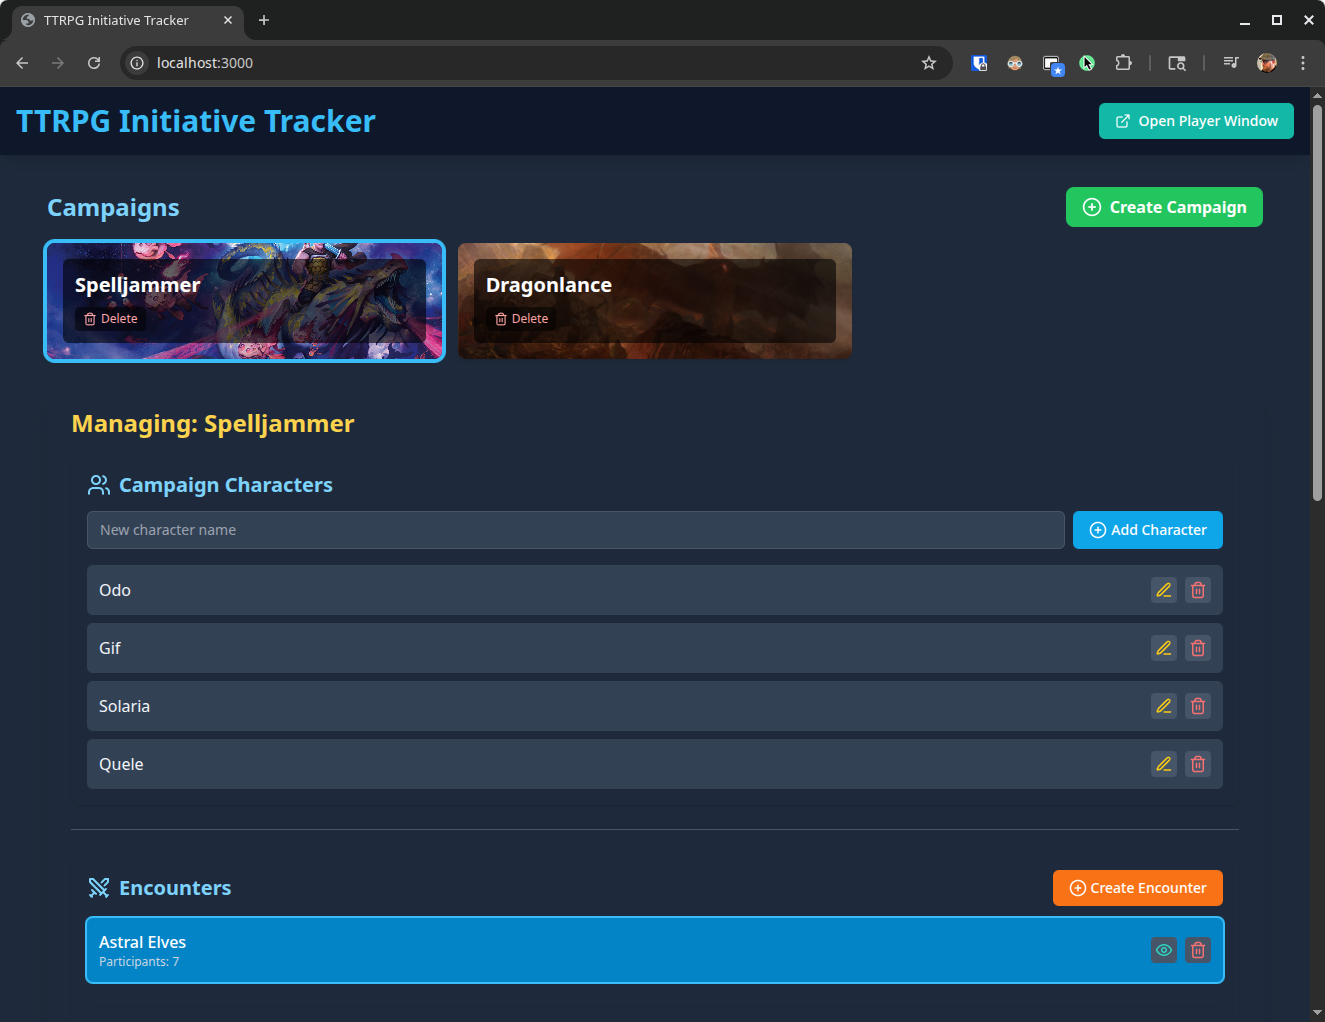
- Campaign Management: Create campaigns to organize your game sessions.
- Character Management: Add and manage characters (player characters) within each campaign.
- Encounter Management:
- Create multiple encounters per campaign.
- Add characters and monsters to encounters with initiative scores and hit points.
- DM controls to start, advance turns, and end encounters.
- Player Display:
- A clean interface showing the current initiative order and participant HP (monster HP totals are hidden, only the bar is shown).
- Option to set a custom background image URL for the player display on a per-campaign basis.
- DM can activate/deactivate encounters for the player display.
- Player display can be opened in a separate window.
- Real-time Updates: Uses Firebase Firestore for real-time synchronization between DM actions and the player display.
- Initiative Tie-Breaking: DMs can drag-and-drop participants with tied initiative scores (before an encounter starts) to set a manual order.
- Responsive Design: Styled with Tailwind CSS for usability across different screen sizes.
Tech Stack
- Frontend: React
- Styling: Tailwind CSS
- Backend/Database: Firebase Firestore (for real-time data)
- Authentication: Firebase Anonymous Authentication
App Usage Overview
The TTRPG Initiative Tracker is designed for Dungeon Masters to manage combat encounters and display the initiative order to players. Here's a typical workflow:
-
Admin Interface (DM's View):
- Create a Campaign: Start by creating a new campaign. You can optionally provide a URL for a custom background image that will be shown on the Player Display for this campaign.
- Add Characters: Within a campaign, add your player characters to the campaign roster.
- Create Encounters: For each combat scenario, create an encounter within the selected campaign.
- Manage Participants:
- Add characters from your campaign roster and any monsters to the selected encounter.
- Set their initiative scores and maximum hit points.
- If there are ties in initiative, you can drag and drop participants (before starting the encounter) to set a specific tie-breaker order.
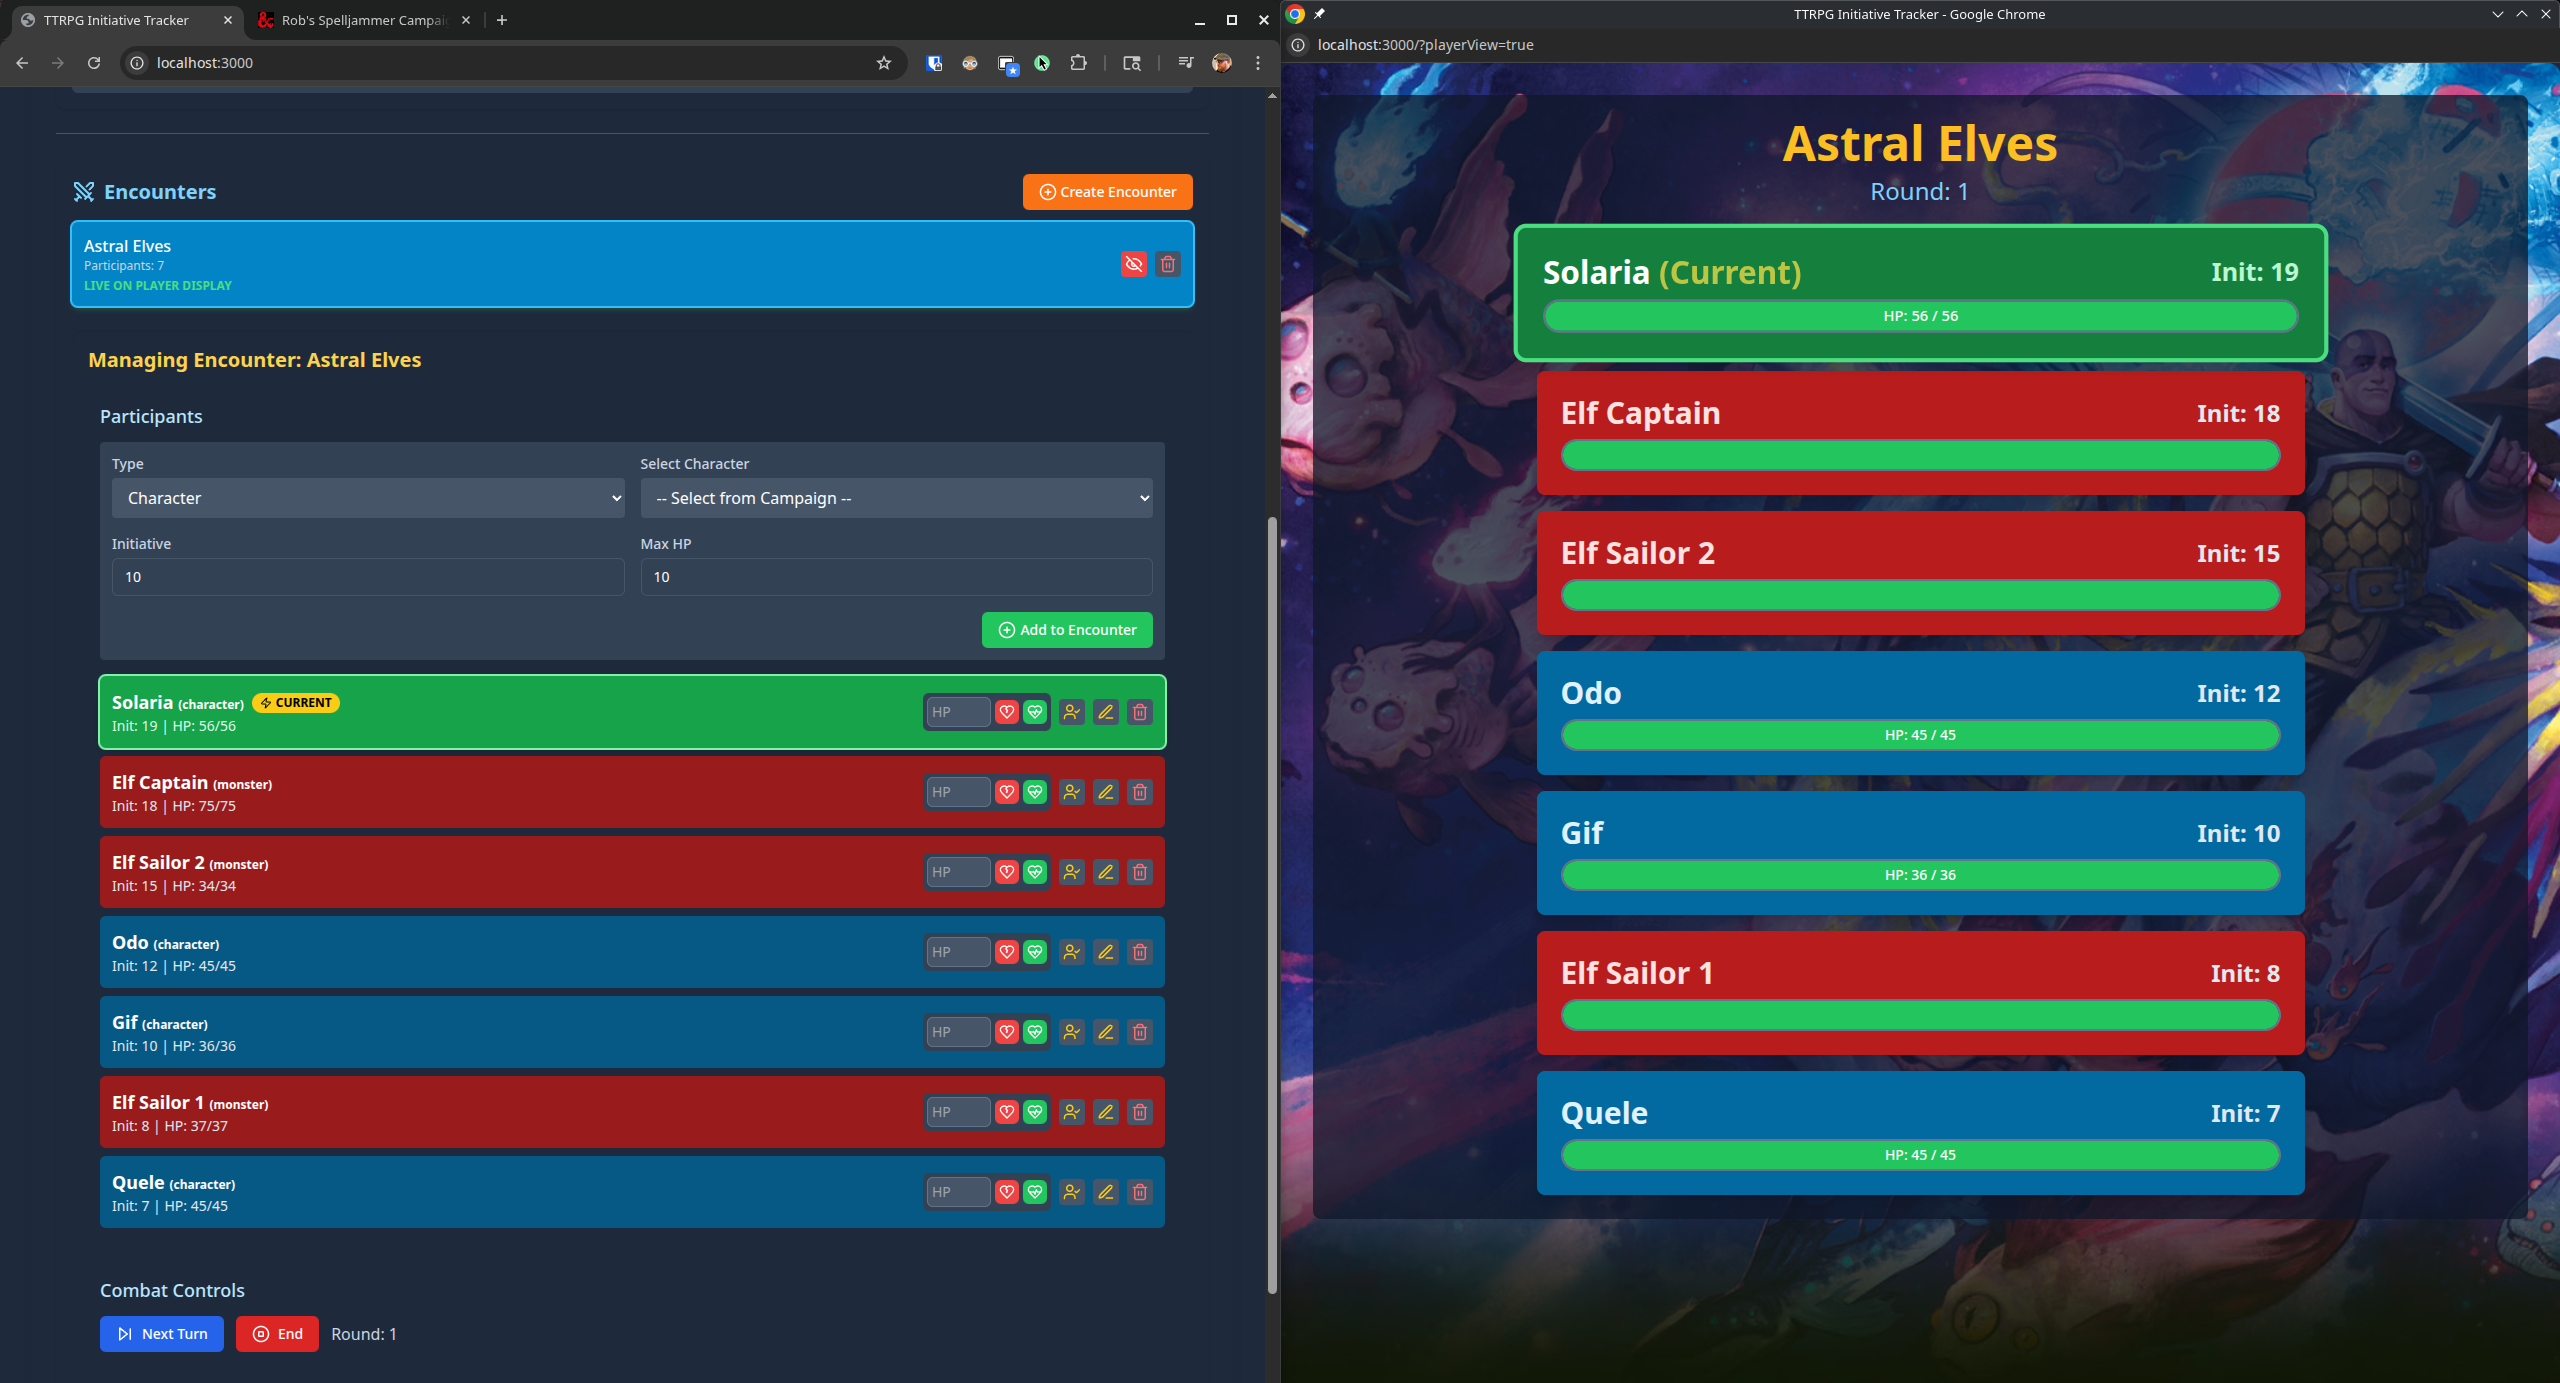
- Control Player Display:
- Use the "eyeball" icon next to an encounter to toggle it as "LIVE ON PLAYER DISPLAY". This controls what is shown on the separate Player Display window. Only one encounter can be live at a time.
- Click the "Open Player Window" button in the header to launch a separate, clean window for your players (ideal for an external monitor).
- Run Combat:
- Once participants are added and initiative is set (including any manual tie-breaking), click "Start Encounter". This also automatically makes the encounter live on the Player Display.
- Use the "Next Turn" button to advance through the initiative order. The current combatant will be highlighted in both the Admin View and the Player Display.
- Apply damage or healing to participants directly in the Admin View during combat.
- Mark participants as inactive (e.g., if knocked out) using the toggle next to their name.
- Click "End Encounter" when combat is over. This will also deactivate it from the Player Display.
-
Player Display Window:
- This window (opened by the DM) shows a simplified view of the active encounter.
- It displays the initiative order, current turn, round number, and participant HP (monster HP values are hidden, only the bar is shown).
- If a custom background URL was set for the campaign, it will be displayed.
- If no encounter is active on the Player Display, it will show a "Game Session Paused" message.
This flow allows the DM to prepare and run encounters efficiently while providing a clear, real-time view for the players.
Getting Started
Prerequisites
- Node.js and npm: Ensure you have Node.js (which includes npm) installed. You can download it from nodejs.org.
- Firebase Project: You'll need a Firebase project with Firestore Database and Anonymous Authentication enabled.
- Git: For cloning the repository.
Local Development Setup (using npm)
Clone the Repository:
git clone <your-repository-url>
cd ttrpg-initiative-tracker
Create Firebase Configuration File (.env.local):
- In the root of the project, create a file named
.env.local. - Add your Firebase project configuration details to this file. You can find these in your Firebase project settings (Project settings > General > Your apps > Firebase SDK snippet > Config).
- Important: This
.env.localfile contains sensitive API keys and should NOT be committed to Git. Make sure it's listed in your.gitignorefile.
Your .env.local should look like this:
REACT_APP_FIREBASE_API_KEY="YOUR_FIREBASE_API_KEY"
REACT_APP_FIREBASE_AUTH_DOMAIN="YOUR_FIREBASE_AUTH_DOMAIN"
REACT_APP_FIREBASE_PROJECT_ID="YOUR_FIREBASE_PROJECT_ID"
REACT_APP_FIREBASE_STORAGE_BUCKET="YOUR_FIREBASE_STORAGE_BUCKET"
REACT_APP_FIREBASE_MESSAGING_SENDER_ID="YOUR_FIREBASE_MESSAGING_SENDER_ID"
REACT_APP_FIREBASE_APP_ID="YOUR_FIREBASE_APP_ID"

# Used for namespacing Firestore paths, can be any unique string for your app instance
REACT_APP_TRACKER_APP_ID="ttrpg-initiative-tracker-dev"
An .env.example file is included in the repository as a template.
Install Dependencies:
Navigate to the project root in your terminal and run:
npm install
This will install all the necessary packages defined in package.json and create a package-lock.json file.
Set up Firestore Security Rules:
- Go to your Firebase project console -> Firestore Database -> Rules.
- Use the following rules for development (allows authenticated users to read/write all data). For production, you MUST implement more restrictive rules.
rules_version = '2'; service cloud.firestore { match /databases/{database}/documents { match /{document=**} { allow read, write: if request.auth != null; } } } - Publish these rules.
Enable Anonymous Authentication:
- In your Firebase project console -> Authentication -> Sign-in method.
- Enable "Anonymous" as a sign-in provider.
Run the Development Server:
npm start
This will start the React development server, usually on http://localhost:3000. The application will open in your default web browser.
Deployment with Docker
This project includes a Dockerfile to containerize the application for deployment. It uses a multi-stage build:
- Stage 1 (build): Installs dependencies, copies your
.env.local(for local testing builds), and builds the static React application usingnpm run build. - Stage 2 (nginx): Uses an Nginx server to serve the static files produced in the build stage.
1. Prerequisites for Docker:
- Ensure Docker Desktop (or Docker Engine on Linux) is installed and running. Download from docker.com.
2. Building the Docker Image (for Local Testing with .env.local):
- Make sure your
.env.localfile is present in the project root and correctly configured with your Firebase details. TheDockerfileis set up to copy this file as.envduring the build for local testing. - Security Warning: The image built this way will contain your Firebase API keys from
.env.local. Do NOT push this specific image to a public Docker registry. For production, environment variables should be injected by your hosting platform or CI/CD pipeline at build or runtime.
To build the image, navigate to the project root and run:
docker build -t ttrpg-initiative-tracker .
(You can replace ttrpg-initiative-tracker with your preferred image name/tag).
3. Running the Docker Container Locally: Once the image is built, run it:
docker run -p 8080:80 --rm --name ttrpg-tracker-app ttrpg-initiative-tracker
-p 8080:80: Maps port 8080 on your host machine to port 80 inside the container (where Nginx is listening).--rm: Automatically removes the container when it stops.--name ttrpg-tracker-app: Assigns a name to the running container.ttrpg-initiative-tracker: The name of the image you built.
You can then access the application at http://localhost:8080.
4. Production Deployment Considerations:
- When deploying to a production environment (e.g., a cloud provider, your own server), you should not copy your
.env.localfile into the Docker image. - Instead, configure the
REACT_APP_FIREBASE_...environment variables directly in your hosting platform's settings or pass them to the Docker container at runtime (if your application is set up to read them at runtime, though Create React App bakes them in at build time). - If your CI/CD pipeline builds the Docker image, ensure these environment variables are securely provided to the build environment.
- Implement strict Firebase Security Rules appropriate for a production application to protect your data.
Project Structure
ttrpg-initiative-tracker/
.dockerignore# Specifies intentionally untracked files that Docker should ignore.env.example# Example environment variables.env.local# Local environment variables (ignored by Git).gitignore# Specifies intentionally untracked files that Git should ignoreDockerfile# Instructions to build the Docker imagepackage-lock.json# Records exact versions of dependenciespackage.json# Project metadata and dependenciespostcss.config.js# PostCSS configuration (for Tailwind CSS)tailwind.config.js# Tailwind CSS configurationpublic/# Static assetsfavicon.icoindex.html# Main HTML templatemanifest.json
src/# React application source codeApp.js# Main application componentindex.css# Global styles (including Tailwind directives)index.js# React entry point
Contributing
Feel free to fork the repository and submit pull requests. For major changes, please open an issue first to discuss what you would like to change.